Last updated on July 20th, 2022 at 07:51 am
DoubleClick for Publishers (DFP) is the most popular ad server that boasts of a number of features and functions such as robust optimization and reporting tools, user-friendly interface, fast and secure services, a definitive support team and others. It also allows publishers to maximize revenue from AdSense ads and that is considered to be its biggest advantage. Thus, an in-depth knowledge of DFP is very important for publishers in order to streamline the entire process.We understand that beginners may find it a little difficult to wrap their heads around the countless properties of DFP. This is why we, at Blognife, seek to make the process of understanding DFP a tad bit easier for new publishers by explaining some key features on our blog.
Publishergrowth: The Revenue Acceleration Platform for Publishers
Blognife is elated to announce the launch of Publisher Growth- a community of publishers that helps you actively accelerate your revenue. This platform assists publishers in growing their traffic and revenue. As publishers, you can share and read reviews of ad networks and hosting companies. You can connect with other publishers to build links for growth and monetization hacks and more. This platform will help you stay up to date with the advertising and publisher ecosystem.

Features:
In this tutorial, we will learn how to create a new line item in DFP. In DFP, a publisher has to add the names of the advertisers from which it is running multiple ads. For each of these advertisers, it has to create an order which is basically a folder containing line items. A line item defines an advertiser’s agreement with the publisher to buy the specific number of impressions ( for CPM), clicks ( for CPC) or time ( for CPD) during a certain time at a certain price. Each line item also includes details with respect to the positioning of the advertiser’s ad and, optionally, the time of the week at which it will get showcased and also to whom it will be displayed.
How to Create a New Line Item in DFP?
Step – 1
A publisher can create a line item in a new order or he can add new line items to previously existing orders.
If the publisher is creating the line item for a new order (To learn how to create a new order in DFP, click here.), after creating the order, scroll down to the line item portion exactly below and start filling out the necessary fields.
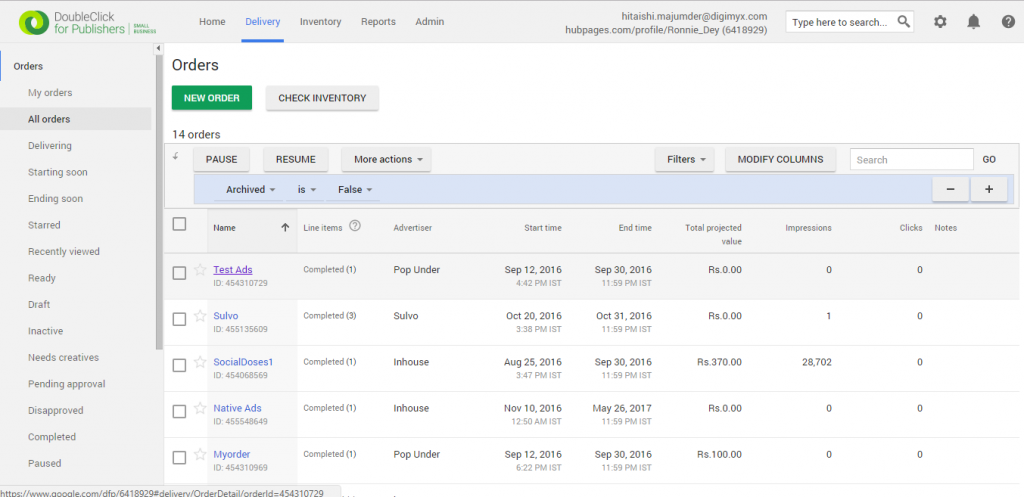
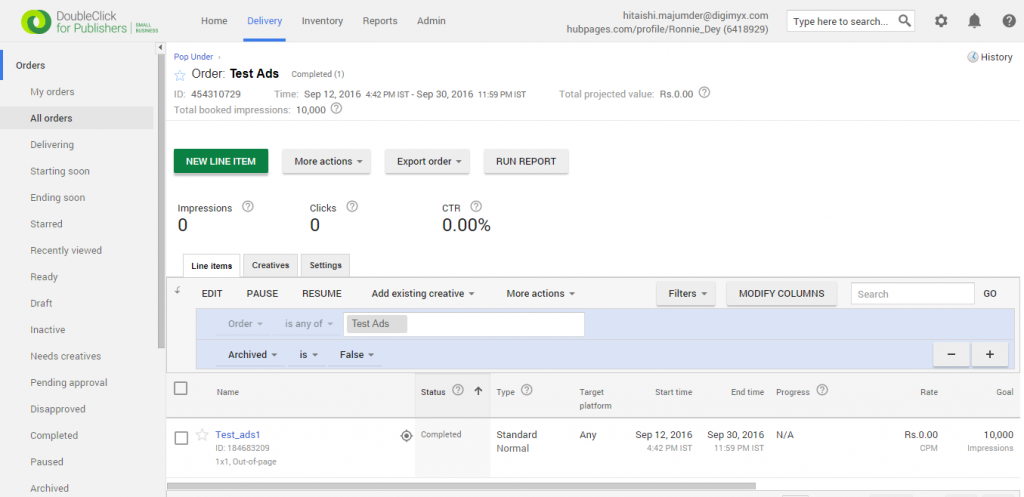
If you want to add new line items to old orders, go to the Delivery tab and click on Orders on the left-hand navigation panel. Once all the orders get listed, you can select the one for which you want to create a new line item and then click on the New line item button. This will bring you to the new line item screen.
Step – 2
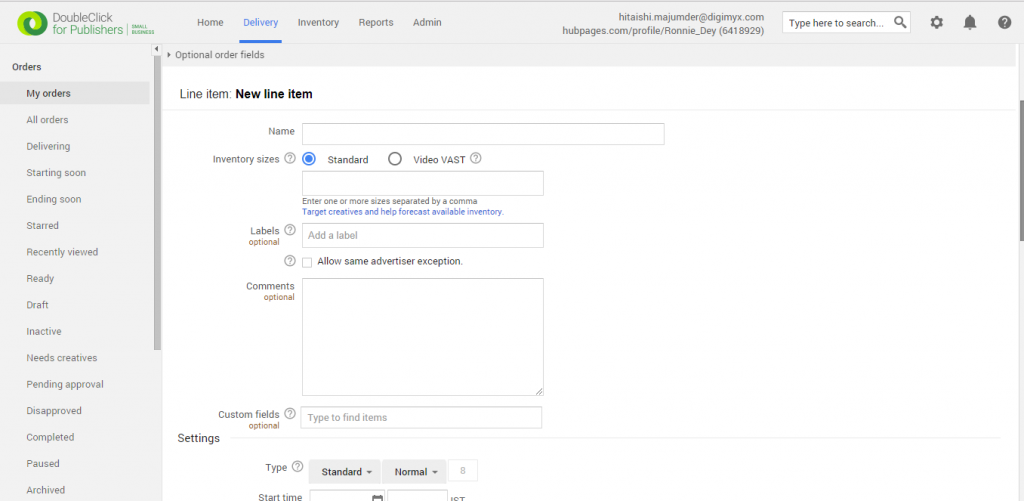
Now on the line item screen, give a name that is unique inside the order and one that you can identify instantly. After naming it, you have to define the size of the ad that is going to serve. A line item can have more than one creative. So you can define multiple sizes for the ad, which means that it will affect the line item serve depending on the Display creatives setting.
Step – 3
You can also add video creatives here by selecting Video VAST and add the size of your video creative in the first size field. You can select any other creative that you want to have in the second size field. Companion creatives are optional.
Step – 4
Labels are optional and we will talk about those in a separate article later. Comments are optional and do not affect the functionality or serving ability of the line item. Custom fields are optional as well.
Step – 5
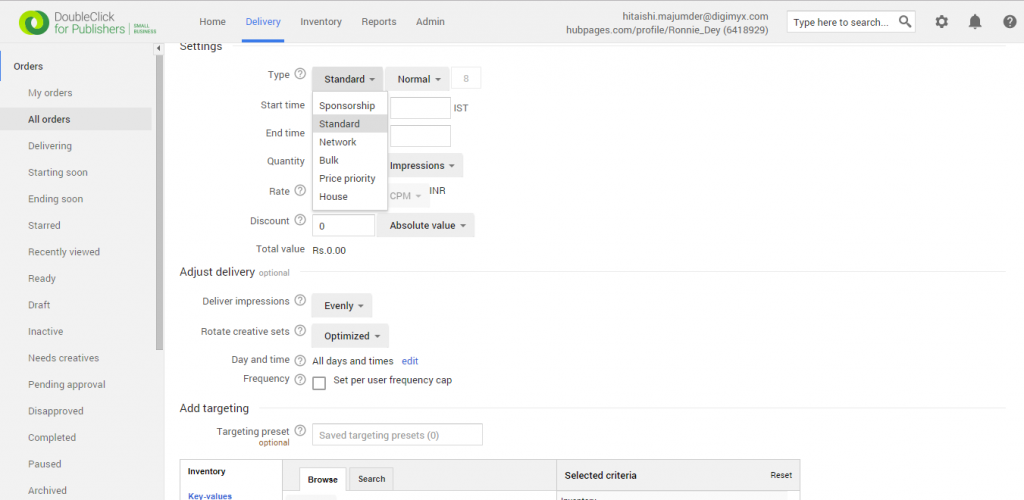
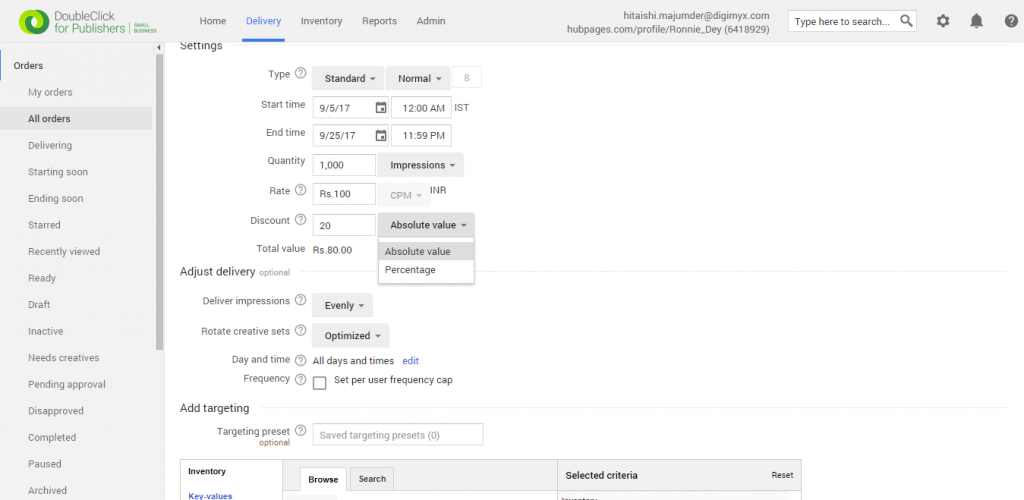
Scroll down to the settings portion and choose the line item type. The settings below will depend on the type you choose. In this tutorial, we will work with Standard line items.
Step – 6
Sponsorship, Network and House being percentage-based line items, you have to fill the percentage of available impressions that you want the line item to fill. Standard and Bulk have specific goals and Price Priority has a goal limit. So, for these line item types, you have to type in an actual number and specify if that number is for impressions or clicks.
Step – 7
Select a start and end time for your chosen line item type. You can add a grace period if you want.
Step – 8
For standard line items, you have to choose between two options – CPM and CPA, and then state your CPM or CPA rate. You can also apply a discount on the line item’s cost. It won’t affect the line item’s serving ability based on CPM. The discount can either imply a number or a percentage. The next part is the delivery settings of line items which we will discuss in the next article.
Creating a line item and navigating through the line item settings is a huge part of how ads will look on your website, which in turn determine the amount of revenue generated. So, this is a huge aspect of website monetization in DFP and it is very important for publishers to know about it in details. We hope this tutorial has been helpful and assists every publisher in creating line items.
Our Recommended Tools for Publishers:
- Best AdSense Alternative- Setupad, Ezoic
- Push Notification Network- iZooto, Unative,
- Best Contextual Ad Network- Media.net (Extra 10% for 3 months)
- Native Ad Network- Mgid
- Popup Ad Network- Exoclick, Propeller Ads
- Best Web Hosting- Bluehost, Hostgator, Stablehost, WPEngine
- Blogging Tools- OptinMonster, Astra, Teachable,

I and my team research various ad networks and can help you increase your overall ad revenue; so you could rake in more greenbacks with the best monetization platforms. Tap into the power of the online publishing business with me. I am just a mail away, so reach out to me if you want to scale up your website revenue. mail: [email protected]

